

The short answer
Let the mat lie flat for 8 hours so the edges lie flat before cutting. The thinner a static dissipative mat the more consistent it performs so cutting should not take multiple passes. Once cut, install one snap and a common point ground per mat to give static electricity a guided path to ground. Use the cover plate screw on a grounded electrical outlet to secure the ring terminal on the end of the common point ground connected to the mat.
How to cut and install an ESD mat
Unroll the mat and let the mat lay flat to prevent curled edges
Unroll slightly more than the length you need and let it rest flat on the cutting surface for about 8 hours before you measure so the edges do not curl up.
Install a Guided Path to Ground for Static Electricity
Place two snaps on the long edge, about 1 inch in from the edges, at the corner nearest the equipment-ground connection. Set them with the mat supported from underneath so the prongs seat through the carbon layer.
Connect the Common Point Ground to the Mat, Wrist Strap, and Electrical Outlet
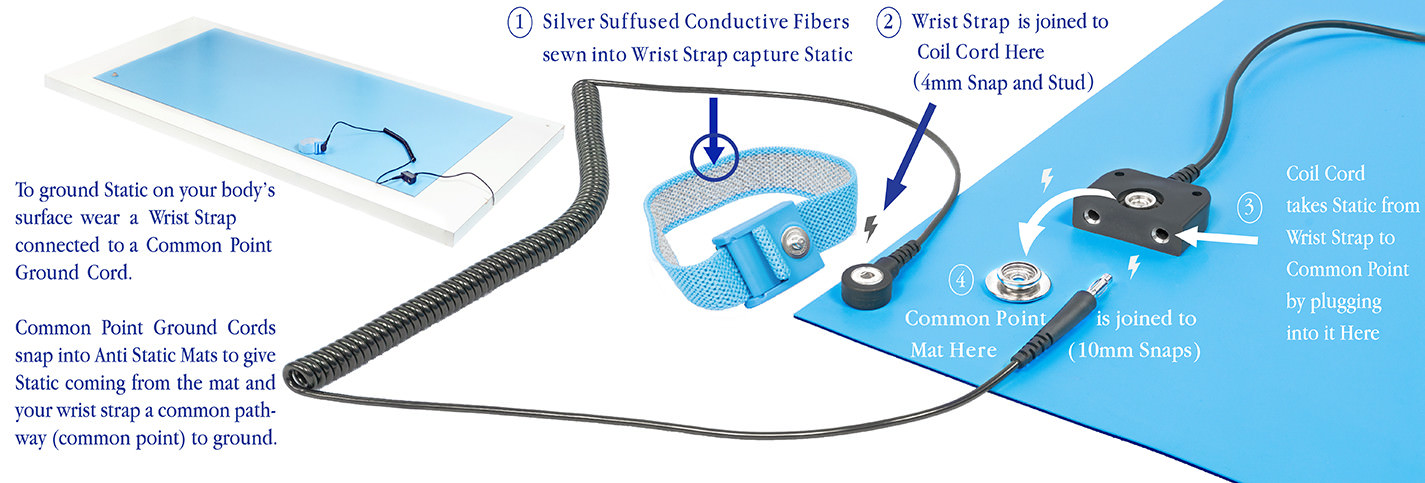
Snap on an ESD common point ground. Use the cover plate screw to secure the ring terminal in the electrical outlet of a grounded terminal. Do not use the outlet's energized contacts. Connect each cable to the common point ground, and plug the wrist strap into the common point ground, not into the mat.
Use continuous monitoring for high-value products
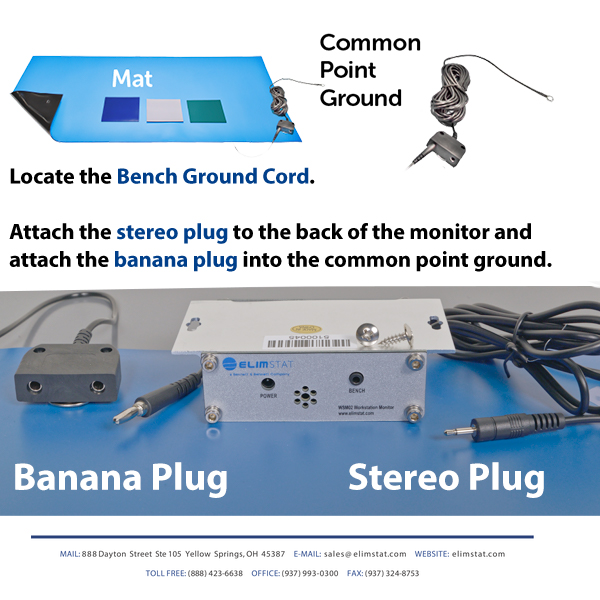
ESD TR19 section 8.1 describes continuous monitoring for high-reliability areas. With the WSM02, plug the wrist strap into the monitor and connect its bench ground cord to the mat’s common point ground. Follow your ESD program’s qualification and compliance verification requirements.
Hardware used in this guide
Draft for review — version 4, November 2026.
How to Connect ESD Mat to Ground
An ESD mat gives charge a controlled path to ground before it can discharge through a sensitive part. The 5300 Series mat is two layers of nitrile butadiene rubber, .08″ (2 mm) thick in total.
The top layer is static dissipative. It is blue, gray, or green and measures under 1 × 10⁹ ohms per square. It bleeds charge off hands, tools, and boards at a controlled rate.
The bottom layer is conductive. It is black because it is loaded with carbon, and it measures under 1 × 10⁵ ohms per square. This is the layer that carries charge out of the mat to the ground path.
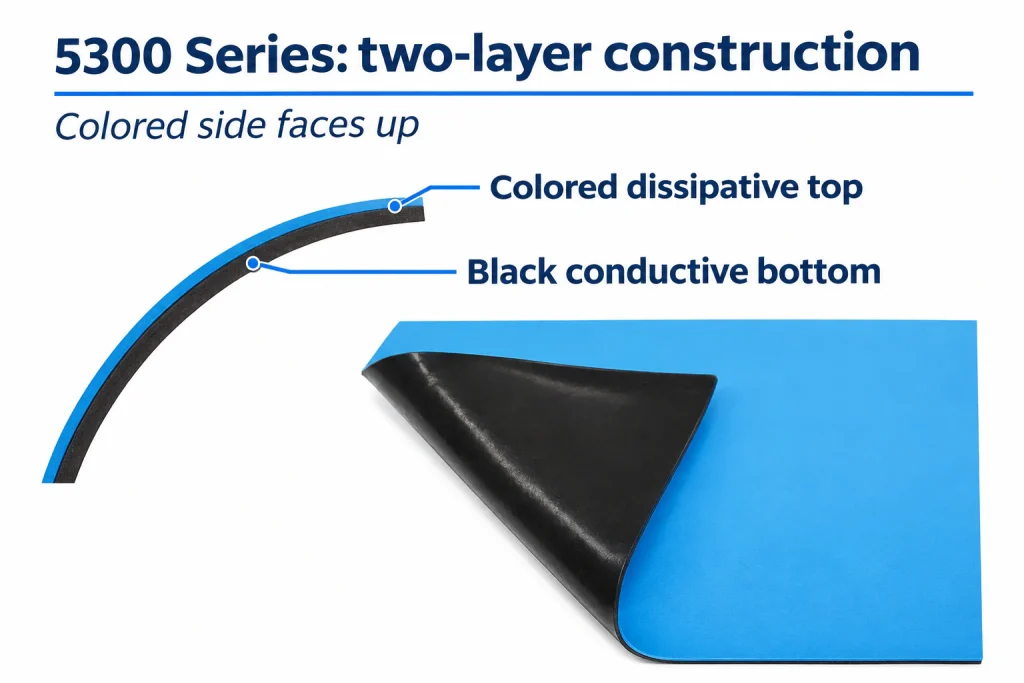
The mat works only if that bottom layer can reach ground. Contact with a bare metal bench is a path only when that bench is bonded to the workstation common point ground and a resistance test shows the mat still reaches it. Paint, a coating, or a loose joint can break the path. If you cannot verify both the bond and the reading, install snaps and a grounding cable. On wood, laminate, painted steel, plastic, or glass, the mat is isolated. ESD ADV1.0 defines an insulative material as one with a surface resistance of 1 × 10¹¹ ohms or higher.
Static decay through the mat is under 0.01 seconds. The published temperature tolerance is 187°F (86°C). That figure does not state a duration or a contact condition, so it is not a claim that a soldering iron or other hot tool can rest on the mat.
Measure and cut the mat
Elimstat ESD Mat Rolls come in 24″, 30″, 36″, and 48″ widths, all fifty feet / 15 meters long.
1. Let the mat lay flat before cutting
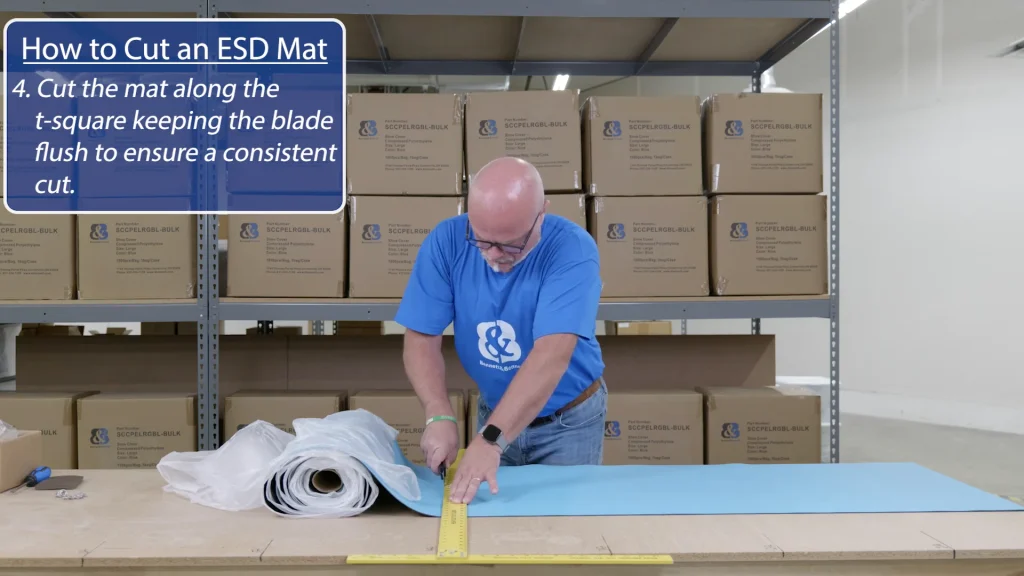
Unroll slightly more than the length you need and let it rest flat on the cutting surface for about 8 hours before you measure so the edges do not curl up. Rubber that has been rolled holds a curve. Cutting it while curved gives a short, crooked edge.
2. Measure the bench
Measure the bench surface edge to edge. Cut the mat to the bench dimensions, not larger. An overhang curls, catches on sleeves, and lifts the mat off the surface. If the bench has a backsplash or a raised lip, measure to the inside of it.
3. Mark the cut on the top side
Mark the cut line on the dissipative (colored) side with a straightedge and a pencil or fine marker. A T-square or drywall square keeps the cut square to the edge of the roll.
Install the snaps and ground the mat
A mat on an insulating bench needs a dedicated path off the mat. The snap is that path. The 5300 mat uses a 10 mm snap, which is what the ESD common point ground and the ESD mat ground are made to fit.
1. Place the snaps on the long side, near a corner
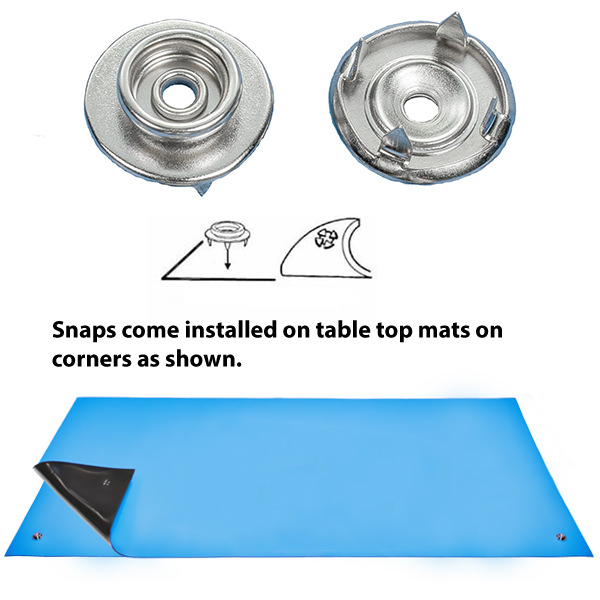
Install two snaps on the long edge of the mat, close to the corner nearest the equipment-ground connection. Two snaps give you one for the common point ground and a spare. They also let you run a mat ground and a common point ground separately if your program wants them split. Keep the snaps about 1″ in from each edge so the hardware does not hang over the bench.
2. Inserting Snaps
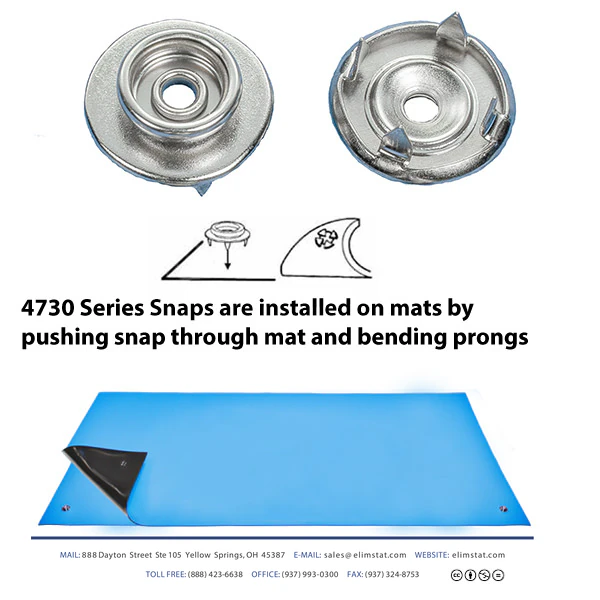
Punch or drill the hole for the snap, insert the snap from the top, and set it with the mat supported from below. The prongs must seat flat through the conductive layer. A snap set on an unsupported mat seats at an angle and loses contact with the carbon layer. That snap will pass a visual check and fail RTG. The hardware is the 10 mm snaps for mats.
3. Common point ground
The ESD common point ground snaps onto the mat from above. It has a flat profile, two banana jacks for wrist-strap cords, and a 15′ cable that ends in a #10 ring terminal. That cable includes a 1 × 10⁶ ohm (1 megohm) resistor. A wrist-strap cord includes a 1 megohm resistor too. The resistor EOS/ESD Association guidance describes is the one in the wrist-strap cord: it limits current in that cord. A wrist strap must not be used if the person may be exposed to 250 volts or more. Neither resistor is permission to work on energized circuits.
4. Bond the common point to the equipment grounding conductor
The ring terminal should be hooked into the electrical outlet of a grounded terminal. Use the cover plate screw to secure it. That center screw threads into the grounded outlet and holds the common point ground. Do not use the outlet’s energized contacts.

“The second step is to connect the common point ground to the equipment grounding conductor (AC ground) …”
— EOS/ESD Association, ESD Fundamentals, Part 3 — Grounding
5. Run one cable per mat
Several cables may meet at the same common point ground. Connect each cable directly to that point. Do not daisy-chain mat to mat. The equipment grounding conductor holds the mat and the other bonded parts of the workstation at the same potential.
6. Ground the person separately
When a person is seated and handling ESD-sensitive items, ground them with a wrist strap. Plug the coil cord into a banana jack on the common point ground, not into the mat. Routing the person through the mat adds the mat’s resistance to the cord and can push the wrist-strap system above the 3.5 × 10⁷ ohm limit in ANSI/ESD S20.20.
Continuous monitoring for high-value, high-reliability products
For high-value products and high-reliability work with zero-defect goals, consider continuous monitoring of the operator and worksurface ground connections. A monitor alerts the operator when a monitored connection fails during work.
ANSI / ESD S20.20 Compliance
Per ESD TR19.0-01-22, section 8.1, continuous monitors can be used for items designated as high-reliability. This includes bonding points, common point grounds, and anti static mats:
“The ground connection of ESD protective items such as ESD mats in high-reliability areas can be tracked by continuous monitors.”
Per ANSI/ESD S1.1, Annex A.3:
“Daily (wrist strap system) testing may be omitted if constant monitoring is used.”
Per ESD TR20.20-2016, section 5.3.2.4.4:
“Typical Test programs recommend that wrist straps that are used daily should be tested daily. However, if the products that are being produced are of such value that knowledge of a continuous, reliable ground is needed, then continuous monitoring should be considered or even required.”
The daily-test allowance above applies to the wrist strap system. Keep the product qualification and compliance verification requirements specified by your ESD control program.
Connect the monitor to the common point ground
The Elimstat WSM02 continuous monitor monitors one person and one worksurface. Follow the WSM02 installation instructions:
- Mount the monitor where the operator can see its lights and hear its alarm.
- Connect its power supply to the monitor and a properly grounded outlet.
- Wear the wrist strap and plug its cord into the monitor’s wrist-strap jack. The OPERATOR light should turn green.
- Connect the bench ground cord’s stereo plug to the monitor’s rear BENCH jack. Insert its banana plug into the common point ground attached to the mat. The BENCH light should turn green.
Care and inspection
Use an ESD-safe mat cleaner. Choose a silicone-free cleaner made for rubber ESD mats, preferably alcohol-free. Follow the cleaner’s instructions. Silicone can leave an insulating film. Avoid pure alcohol and solutions containing 70% alcohol or more. They can dry out the mat, making it hard and brittle over time. A formulated mat cleaner may contain a small amount of alcohol as a drying agent. That differs from wiping the mat with concentrated alcohol.
Inspect the snap and the cable. Check for loose snaps, damaged cords, and connections that have pulled free. Confirm that the snap remains seated through the carbon layer.
Verify the setup after anything changes. Follow your ESD program after moving a bench, changing a ground connection, lifting and re-laying a mat, or cleaning up a spill.
Check a monitor with the ESD monitor tester according to your program’s verification schedule.
Example: A Computer Repair Lab
This is a planning example for a five-station computer repair lab. It is not a record of a customer installation.
| Station need | What covers it | Qty |
|---|---|---|
| Bench surface, 5 benches at 30″ × 60″ | One 30″ × 50′ roll, cut into five 60″ lengths | 1 roll |
| Snaps | Two per mat | 10 |
| Ground for mat and operator | ESD common point ground, one per bench | 5 |
| Operator ground | ESD wrist strap with 6′ coil cord | 5 |
| Continuous monitoring for high-value work | Elimstat WSM02 monitor, one per bench | 5, if required by the ESD program |
Five 60″ cuts use 25′ of a 50′ roll, which leaves enough for a second lab or for cart and shelf liners. Each bench gets its own cable to the common point ground. The alternative is five 2′ × 4′ ESD Workstation Mat Kits, which ship with the snaps already in and skip the cutting entirely. The trade-off is cost per bench against install labor. The kit is the right call when the benches are a standard size and you would rather not cut.
If the lab handles anything high-value, add a continuous monitor at each bench. The decision rule is product value: when the cost of one undetected ESD escape exceeds the monitor’s cost, constant monitoring is the proportionate control. ANSI/ESD S1.1 Annex A.3 allows daily wrist strap testing to be omitted when the strap is constantly monitored.
Example: A Static Dissipative Mat used as floor runner in the context of S7.1
Static dissipative mats can be entirely acceptable for multiple uses in data centers. These include floor runners in walkways and narrow aisles around racks, where electronics are placed together in tight confines. Static dissipative matting can also serve as a rack or shelf liner.

For a floor runner, the relevant resistance test method is ANSI/ESD STM7.1, often referred to as S7.1. It recognizes conductive and dissipative flooring systems. The EOS/ESD Association’s explanation of STM7.1 emphasizes the complete flooring system. Evaluate the installed runner and its grounding connection against your ESD program’s flooring requirements.
When the runner provides personnel grounding, evaluate the person, footwear, and flooring together. ANSI/ESD STM97.1 measures that system’s resistance; ANSI/ESD STM97.2 measures walking body voltage. The EOS/ESD Association’s flooring and footwear guidance explains why both matter. Use ESD footwear or heel grounders suited to the qualified system.
Elimstat lists the 5300 Series mat rolls for floor, rack, shelf, cart, table, and tray-liner uses. A grounded dissipative liner can provide a surface for electronics placed close together inside a rack. Where unprotected ESD-sensitive items rest on that liner, evaluate its worksurface role under ANSI/ESD STM4.1. A walkway runner and a rack shelf liner can use the same type of material, with qualification appropriate to each role.
Questions this guide answers
How do I cut an ESD mat roll?
Let lie flat overnight or up to 6-8 hours. The rubber needs to lay flat so that the edges do not roll up.
Which side of an ESD mat faces up?
The static dissipative side — blue, gray, or green. The black side is the conductive carbon layer and faces the bench.
Where do the snaps go on an ESD mat?
We assemble cut mats with two snaps on the long edge. If you are installing snaps yourself insert 1 snap about 1 inch from the edge. The top of the snap should be on the static dissipative side. You only need one snap for a common point ground.
Do I need a grounding cable if the bench is metal?
Paint, a coating, or a loose joint can break the path. If you cannot verify the bond and the reading, install snaps and a common point ground into the mat. Wood, laminate, painted steel, plastic, and glass are insulators that restrict electric flow. If they are part of your work area it is best to use a common point ground.
What is the difference between a mat ground and a common point ground?
A mat ground grounds the mat alone. A common point ground grounds the mat and gives a wrist strap its own banana jack to ground through at the same point.
Can I connect multiple ESD mats together?
No. Connect each mat directly to an electrical outlet. Multiple mats can be connected to the same outlet. Daisy-chaining mats increases the net resistance since the mats do not connect directly to ground.
Can I connect my wrist strap to the mat with a clip?
No. At a monitored bench, plug the wrist strap into the monitor’s wrist-strap jack. Otherwise, plug it into the common point ground. Grounding a person through the mat adds the mat’s resistance to the cord and can push the wrist-strap system above the 3.5 × 10^7 ohm limit in ANSI/ESD S20.20.
When should I use continuous monitoring?
Consider an ESD continuous monitor for high-value products or high-reliability work. ESD TR19 section 8.1 addresses monitoring ground connections in high-reliability areas. ANSI/ESD S1.1 Annex A.3 allows daily wrist strap system testing to be omitted with constant monitoring. Keep the qualification and compliance verification requirements in your ESD program.